Thursday, January 20, 2011

Figuring out what your proxy is

If you work in corporate America chances are you are going through a proxy when you are surfing the web. Sometimes the proxy server is specified, sometimes you have a url that then determines what proxy to go to. If the server is directly specified as shown in the Proxy Server address below (the lower yellow area), then it is easy to tell. What is there is your proxy server.

On the other hand, if you have a .pac file or out configuration script that is being used then it is hard to tell from here because the rules are in the .pac file. This would be specified in the first yellow area shown below. You can use FireFox or sometimes Internet Explorer to save the .pac if you go to it in the browser. It can be saved and opened in any text editor. You can’t change it, but you can at least see what it is doing. But the question I had was how do I confirm what proxy server the .pac file has directed me to?

image

No matter what these settings are you can tell for sure what you proxy server you are actually connecting to by using the command line. First make sure you have Internet Explorer open and on the page in question. Open a command prompt (Start menu | Run… | cmd.exe) and then type the following:

netstat –b –n –p tcp

Now look for iexplore.exe. You will see something like

image

Notice I have highlighted the proxy server and port in yellow.

If you want to know what that is from a dns name perspective, you can use nslookup to look it up.

In this example, you would type:

nslookup 134.27.74.36

This will return some name of the server if you are lucky.

Tuesday, January 18, 2011

How to pass a list of ids to a stored procedure and iterate over them using a cursor

As you probably know there is no array type in T-SQL. Let’s say the end user selects some records and you want to pass the ids of each of these records to a stored procedure. You can just use Dynamic SQL to handle this, but what if you actually want to use a cursor to iterate over each one and do something for each item. There are many reasons such as calling a stored proc for each item or maybe sending mail, etc. In general I don’t like cursors because they are slow, but I think there are cases. I had one of those cases, and the number of records I needed to loop through was small so I have no problem doing so.

The idea is to just pass the list of ids as comma separated values as a string as a parameter to a stored procedure. Be careful how this list is generated. You never want to leave this data unchecked for SQL Injection attacks. In particular, I recommend building an array of integers (not strings) in .NET and then converting the array to a comma separated list of ids. I got the idea from here. I also has a wealth of other techniques for simulating arrays in T-SQL.

The problem you will soon run into is that you can’t use standard Cursor syntax when you use Dynamic SQL. The code below shows you how you can do so using a Cursor Variable. You can also do it using a Global Cursor. If you want to go the Global Cursor route, check out the code here.

The code below basically is called something like this:

IterateThroughItems ‘1234,456,789’

This would select three records with ids 1234, 456, 789 and then print out the ID. Instead of printing out the ID, you could print the FName, LName, sendmail, update other tables, whatever you like.

-- WARNING: The end user should NEVER be able to enter or submit any information that is then passed into
-- the @IDs parameter. If they do, SQL-injection is available for them to hijack the database.
-- Only pass data that has been type-checked, etc. For example, I recommend using an array or list of
-- integers in .NET and then using string.join() to populate the value of @IDs.
create proc IterateThroughItems @IDs as varchar(2000)
as

Declare @SelectStmt as nvarchar(3000)
Declare @Sql as nvarchar(3200)

Declare @ID as int
Declare @FName as nvarchar(50)
Declare @LName as nvarchar(100)

-- this is a cursor variable and is needed so we can use dynamic-sql which we need to deal with the list of ids
Declare @PersonCursor CURSOR

Set @SelectStmt = 'select ID, FName, LName from Person where ID in (' + @IDs + ') order by ID'

Set @Sql = 'Set @PersonCursor = CURSOR FAST_FORWARD FOR ' + @SelectStmt + '; OPEN @PersonCursor'

exec sp_executesql @Sql, N'@PersonCursor CURSOR OUTPUT', @PersonCursor OUTPUT

FETCH NEXT FROM @PersonCursor into @ID, @FName, @LName

WHILE @@FETCH_STATUS = 0
BEGIN
print 'Processing: ' + Cast(@ID as varchar(20))

FETCH NEXT FROM @PersonCursor into @ID, @FName, @LName
END

CLOSE @PersonCursor
DEALLOCATE @PersonCursor

Using LINQ in a foreach loop to build a query

I love using LINQ because it makes building up queries so easy. The exception to this is when using a foreach with a union. I suspect it is just the foreach that is causing this behavior, but for sure the behavior is consistent when using both.

Let’s pretend that you have a list of people that you let the user select one or more people from. You want to pull back the person records of just the records they selected. Maybe you want to do a database round-trip to get the latest data before an edit or may you just want to filter the list in memory. In either case, this post addresses both of them since LINQ is used in both cases. The only difference may be is that instead of a List<People> you may be using an IQueryable<Person> if you are using the database. The tricky step is identical. I know because I was originally seeing the issue on the database example I had. I wrote this using just standard LINQ (to Objects) and in memory objects to make the running of this easy for you.

With that said, I have created a Person class below that is meant to simulate the Person table in the database. I then populate it with three records (Person objects). I then specify that I want just the people with the ids 1 or 2. I then run the query, dump the results. This shows the issue. We only get one record back. Then I run the next query and dump the results. This time the results are correct and give us two records as expected.

What is the difference in implementation you ask? There is very little different. In both cases there is a foreach loop and use the union method to build up a query. Union is similar to using an OR in the where clause of a SQL statement, but often the performance is much better. The downside is that much of the query is duplicated and makes maintenance a pain. No so with LINQ. It is very easy to do so here.

The ONLY difference between what works and what doesn’t work is that I declare a LOCAL variable INSIDE the foreach loop. I then use the LOCAL variable as a parameter in the LINQ expression. I have to assume this causes it to get the value from the variable before the LINQ expression is evaluated and thus it has the value we want. Otherwise, I assume it just looks at the current (last value) of the variable declared in the foreach statement itself at the end after the foreach loop has finished executing. I don’t know exactly how it works, but that is my assumption based on what I see from the behavior of the two methods. I don’t know if I would call this a bug or not, but it is not intuitive to me and makes for it to be very easy to write buggy code if not properly tested.

public class Person
{
public string Name {get; set;}
public int ID {get; set;}
}

List<Person> people = new List<Person>();

void Main()
{
// simulate a database and a table called people that has 3 records
people.Add(new Person{ Name="Brent", ID=1});
people.Add(new Person{ Name="Lance", ID=2});
people.Add(new Person{ Name="Kim", ID=3});

// this could ids of the records the user selected
List<int> idsToFind = new List<int>();
idsToFind.Add(1);
idsToFind.Add(2);

// execute the query
var allPeople = GetPeopleByIDsBroken(idsToFind);

// output the results
allPeople.Dump();

// The results will be ONE record and that is Lance
// This might be surprising because we passed in the ids for Lance and Brent.

// execute the query
var allPeople2 = GetPeopleByIDsWorks(idsToFind);

// output the results
allPeople2.Dump();

// The results will be TWO record and that is Brent and Lance
// This is the expected result and what we wanted.
}


IEnumerable<Person> GetPeopleByIDsBroken(List<int> ids)
{
IEnumerable<Person> builtUpQuery = null;

foreach (int id in ids)
{
// first time through only.
if (builtUpQuery == null)
{
builtUpQuery = people.Where(p => p.ID == id);
}
// all subsequent times
else
{
builtUpQuery = builtUpQuery.Union(people.Where(p => p.ID == id));
}
}

return builtUpQuery;
}

IEnumerable<Person> GetPeopleByIDsWorks(List<int> ids)
{
IEnumerable<Person> builtUpQuery = null;

foreach (int id in ids)
{
// We have to get a local copy of the id.
// Othewise, the value is not taken from the id in the foreach loop
// until the entire expression is evaluated
int localCopyOfID = id;

// first time through only.
if (builtUpQuery == null)
{
builtUpQuery = people.Where(p => p.ID == localCopyOfID);
}
// all subsequent times
else
{
builtUpQuery = builtUpQuery.Union(people.Where(p => p.ID == localCopyOfID));
}
}

return builtUpQuery;
}


Sunday, January 16, 2011

BrentBot is born today

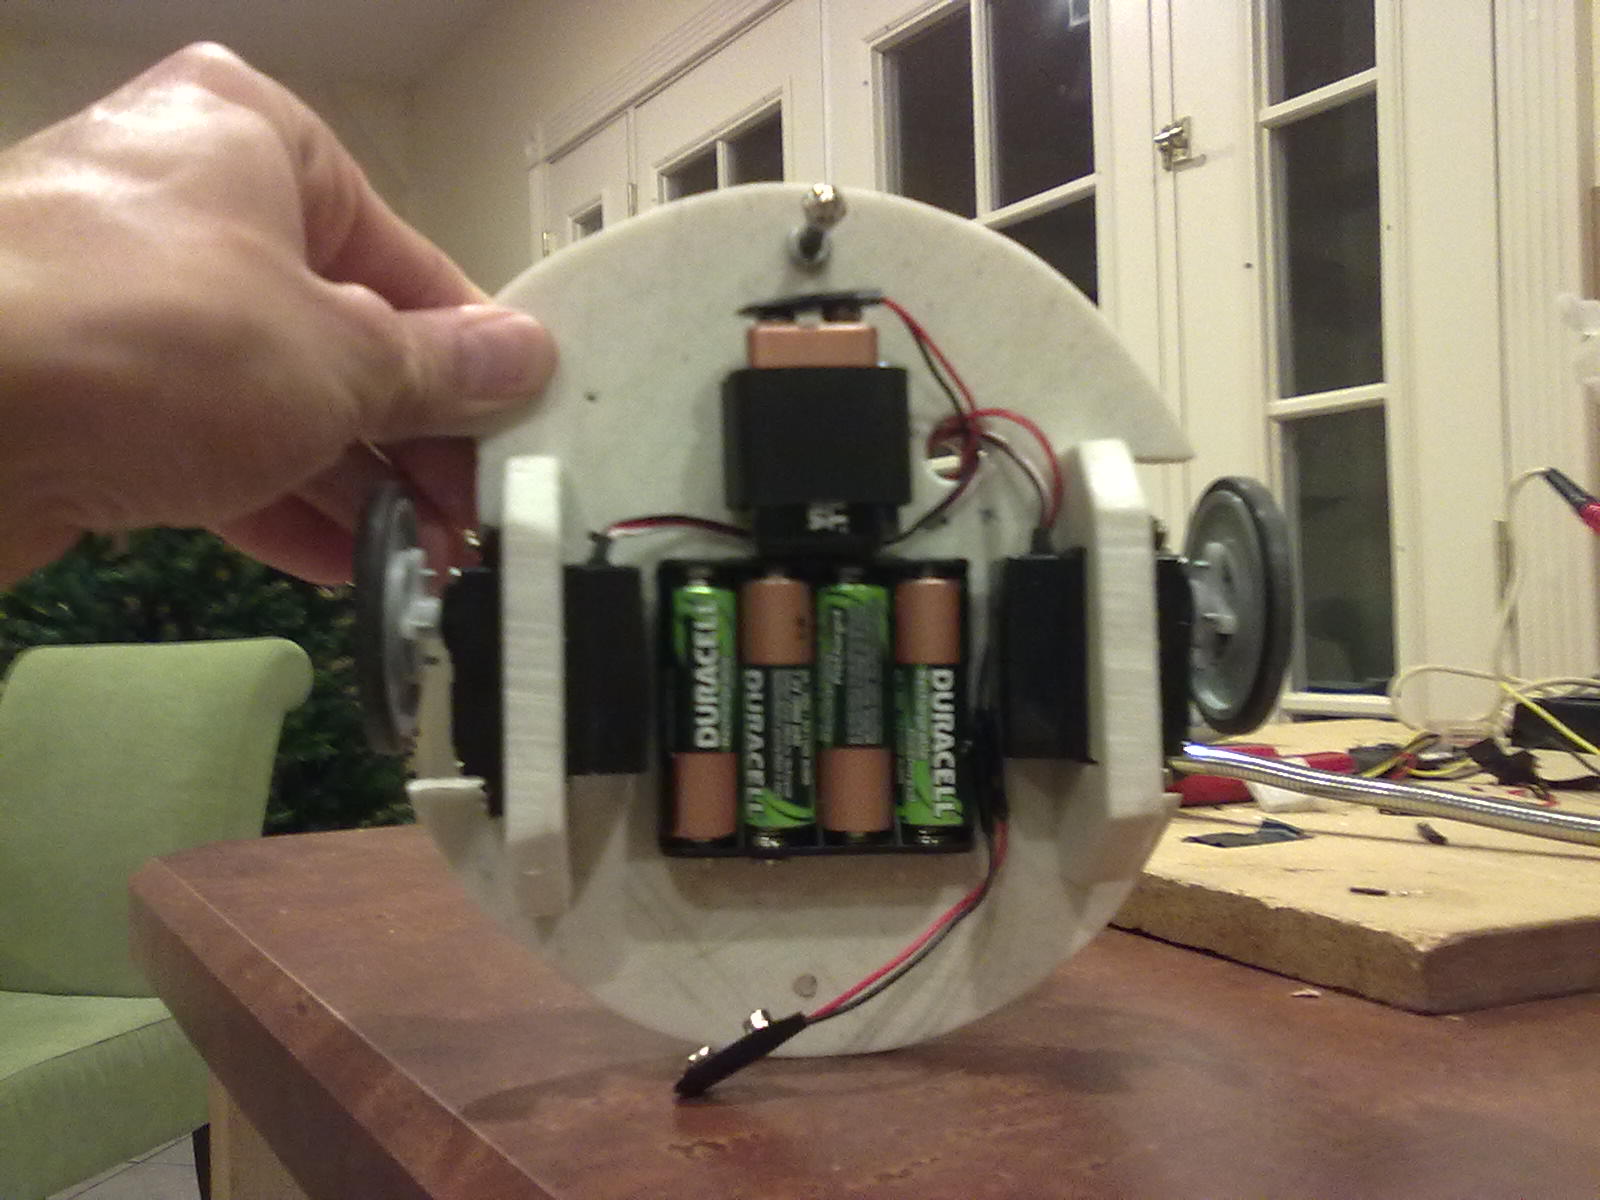
Here is my robot - BrentBot
I am very excited to have created a robot from scratch. It took a lot of research to figure out how I wanted to build the robot. In the end, I followed an article in Servo magazine that walked me through it. Like most things in life, it didn't go quite as I planned. I didn't have all the parts that the article required, so a lot of them I found at Ace Hardware and later found out that Fry's Electronics had cheaper screws when I bot some other stuff there. If you have a Fry's electronics where you live, you can start there. Some Radio Shacks are supposed to have some of this stuff, but most requires it be ordered online and shipped to your home or Radio Shack for pickup. There are lots of Robot companies online. I personally like RobotShop since it has such a wide variety of things and they at least have a branch in the US even though they are a Canadian company.
The cost was about $100, but I didn't end up using everything, so like the article said, it is probably pretty close to $85. If you want professional results or just want to save a ton of time fabricating the deck, connecting wheels, making servo mounts, etc I highly suggest buying them. The cost was actually only around $15, but I wanted to see what I could come up with.
I made my deck out of nylon cutting board. It is very strong and durable and doesn't split at all (from what I can tell). The downside is that it is not as easy to work with as I had hoped. For instance, I used my Jigsaw/Scrollsaw, etc to cut it and found that even on the lowest speed it just melted the nylon and made a mess and was hard to cut. By the end, I figured out that if I just tap the trigger and then push the saw through until the blade stopped this was slow enough and kept everything cool enough that it was fairly accurrate to cut with and was managable. If I had to do it again, I probably would not use this material again, but it was free since it was an old cutting board. I did sand it down to make it smooth since there were so many knife marks on it.
The cutting board was a bit thicker than the original design called for and the wheels that I chose were smaller that suggested I ended up changing the original design from a two decker to a one deck robot for now. This actually worked to my favor. Now, I was able to mount the servos and the batteries on the underside of the deck and still had all the room on the top side of the deck. So really I have the same amount of deck space, but with half the height and much less weight. I like my design actually.
I chose the Arduino Uno as the brain for controlling everything. Mostly because it is open source and open hardware and it is WAY cheaper than the Parallax Stamp Kits. Personally, I don't like VB or anything that looks like VB and that is what the Stamp uses. Unless you want to pay even more the Javaline I think it is called. That is just way too expensive for me just to not write in VB like language when I have a much cheaper (and significantly more power) processor (Arduno Uno). My goal was to build a robot under $100 and I succeeded. Granted it doesn't do much because it doesn't have any sensors. I'll add those later at additional cost obviously, but they will come in time as they are needed.
As word about Parallax and the BeoBot. If you don't want to work really hard and do this all from scratch and you want support and supported enhancements, I think the BeoBot would be great. I also think the Lego Mindstorm is a bit more pricey, but you can do so much in a short amount of time with it. If I didn't have such a strong desire to build this robot from scratch just to say that I did it all, you may want to seriously consider one of those other options. The lego solution is great because there are parts readily available and you can create so many different kinds of robots in little time.
Don't underestimate the time it takes to fabricate everything. Designing a robot from scatch takes a lot of time. You have to think about how wires will be run, line up holes on parts, match nuts and bolts, solder, and in general just spend time though trial and error. Don't forget the error part is great for learning, but takes time.
I soldered the battery connectors and barrel connector for powering the Arduino. This was time consuming. I did remember how to solder thankfully. I also figured out to de-solder because I had the polarity of the barrel connector backwards. I don't know how I did that. I did figure out that the barrel connector needs the positive on the inside part and negative on the outside part. Even with that knowledge, I got confused. Oops. Oh well, in the end it gave me a chance to add more length to the plug since the first one was a bit short. Good luck de-soldering the wires from the barrel connector if you wrap them around the posts before you solder them. They will never come off without a LOT of work, though I did finally get the wires off and new ones put on.
When cutting the servo brackets they need to fit snuggly around the servo. This is because the mounting brackets on the servos are right there close to the sides of the servos. If you leave too much space around the servo the screws that go in the mounting brackets won't have anything to screw into. This kind of defeats the purpose of the servo brackets.
I did and you probably will also need to have two sets of power supplies. One for the Arduino and one for the servos. The reason is that the Arduino can only handle so many things plugged into it. This is especially true when it comes to the Servoes. Besides, it is good design to have separate drive system power. That way there isn't noise (electrical noise) that can make your Arduino and you cicuits act funny. Don't worry, it is actually very easy. All you do is connect the grounds together and they work great.
Once BrentBot started to work, I quickly found out I will need at least one swithc for the power. I don't have one right now and everytime I want to test anything, I have to disconnect the main barrel connector, and plug in the usb cable. Not to mention, I usually have to disconnect the batteries for the drive system. While not a pain, these plugs will eventually wear out and they are not really cheap to replace. A switch is a much better solution and allows for faster test cycles.
Servos are great for a simple light weight robot that is under say 3 pounds. Over that, you'll have to get the large servos or go to a motor and gearbox. In either case, always get wheels that mount directly on the servo's shaft. If you don't, you will be spending lots of time trying to figure out how to mount a wheel onto it like I did. In the end, I think it is quite straight.
When you are writing your code to control the servos there is a library to do so. This doesn't mean you have nothing to do. You still have to write your basic functions like forward, reverse, turn left, turn right. If you don't attach and the detach for each of these functions your servos may jitter when they are idle. To prevent the jitters all just make sure you detach after each function call. This has the added benefit of saving your battery life also.
The power for the Arduino is a single 9V battery. The drive system is powered by 4 rechargeable AA batteries. I highly recommend rechareable batteries. Otherwise, you will be spending a lot on batteries. They don't really last long.
By all means, unless you have servos already, be sure to by the continuous rotation versions. They are the same price and will save you from trying to figure out how to take one apart and modifying it. If you need to modify it, there are article on the internet that tell you how to do it. I didn't want to bother with it. It seems silly these days when continuous ones are readily available at the same cost.
I found that having old computer plugs, wires, etc came in handy. If you have the long header pins they fit the computer plugs perfectly because a computer is a circuit after all. I also found the wire useful for the power lines since they are pretty thin. Yes, I know you can buy wire, but it usually isn't two wires side by side which creates less mess, and in my case I had them already so they were free to me. If you don't have them, consider an old computer from a garage sale that would have stuff you can use. Goodwill is another option that can be fairly inexpensive. On the other hand, unless you find just a screaming deal, you are probably better off just buying wire and taping them together, or using zip-ties.
It is important that you get your polarities correct. This is particular important with your servo. if you get this wrong, you can permanently damage your servo. I think the Arduino can cope even if the polarity is reversed, but I don't really recommend it. The easy way to do this is with a battery tester or better yet a multi-meter. To see which wire is the positive one, you touch the wire to the red lead of the meter, and the other wire to the black lead of the meter. If you get a positive voltage (or if the battery tester says good) then the wire on the red lead is your positive wire. If you get a negative voltage or no ready on the battery tester then the wire on the red lead is negative. In general it is a good idea to start at a larger range on your multi-meter. Says something like 20, but starting at 2 should be good also since we are talking about small voltages here and it is know to be say 9Volts for a 9Volt battery.
I hope this is useful to someone that is starting with robotics.

Thursday, November 11, 2010

Getting Current User information in Silverlight 4

Let’s assume for a Silverlight application. You may be wondering where to find out who the current user is. In ASP.NET there is a User property on the Page object (also other places such as the HttpContext.Current), but where is that in Silverlight 4 (not in early versions that I am aware of). The answer is the WebContext.

I think the WebContext was introduced in Silverlight 4.You The WebContext is created in the constructor of the App class that is in the App.xaml.cs file. If it isn’t you may be using a different type of Silverlight 4 project than the Silverlight Business Application or Silverlight Navigation Application. If you app doesn’t have this, I am assuming you can add it. Just create on of these projects and copy what is done there.

Among other things, the WebContext has a User property. This gives you what acts like what you may expect if you are accustomed to ASP.NET. For example, it has a Roles property to see what roles the user in. It has a IsUserInRole() method to see if a user is in a particular role. It has a Name property that gives you the username.

The WebContext is accessible from code by using WebContext and is also added to the Application Resources in the Application_Startup method which makes it accessible via XAML. To show the current username using XAML you would do something like the following:

<TextBlock x:Name="CurrentUser" Text="{Binding Current.User.Name, Source={StaticResource WebContext}}" />

Using XAML is really great because as Current.User changes from null to some value when the user logs in or Windows Authentication logs them in automatically, the TextBlock will be notified and display the change.

. The same is NOT true if you use code that you may write in ASP.NET to set the value. For example:

Assume you XAML is now defined like this:

<TextBlock x:Name="CurrentUser" />

You might be tempted to write the following line of code

CurrentUser.Text = WebContext.Current.User.Name;

The problem is that WebContext.Current.User may be null initially AND the biggest problem is that you won’t be able to pick up the Name since it may NOT be set yet. Really what we want is to using Bindings which notify the other side of the binding when the value changes. This means that initially we would get no username, but as soon as it is loaded we would be notified that there is a new value and we can show it.

The code is a little more complex than above, but not really too bad. Basically, we are trying to do what we did in XAML in the first example, but do it in code. Here is all you have to do:

CurrentUser.SetBinding(TextBlock.TextProperty, WebContext.Current.CreateOneWayBinding("User.Name"));

Now we the CurrentUser textblock will always display the current value of WebContext.Current.User.Name even as it changes.

Wednesday, November 3, 2010

Getting the Action or DynamicDataRoute from a DynamicData page

If you are working in a Dynamic Data web application sometimes you may need to know what the Action (List, Details, Edit, Insert) is. The Action is just a string and is set in the Global.asax.cs in the RegisterRoutes() method that is called on application startup. Actually, if you look at each route that is added, the object being added is a DynamicDataRoute object. This is the object we eventually want to access since it has our Action property.

When you are on a PageTemplate, a CustomPage, EntityTemplate, or a UserControl that you use in one of the previous items you have access to a class called DynamicDataRouteHandler. It has a static method called GetRequestContext() which has a RouteData property. This gives us the RouteData object which has a Route property which is of type BaseRoute. Remember, we need to get an instance of the DynamicDataRoute. As it turns out DynamicDataRoute is a subclass of Route which is a subclass of BaseRoute. So, all we have to do is cast the BaseRoute object we now have to a DynamicDataRoute and we now have access to the Action property.

I guess that is a lot of explaining for a few lines of code :) Here is the code.

RouteData route = DynamicDataRouteHandler.GetRequestContext(Context).RouteData;
DynamicDataRoute ddRouteData = route.Route as DynamicDataRoute;
string action = ddRouteData.Action;

Tuesday, November 2, 2010

Adding an item to the ValidationSummary programmatically

In ASP.NET, the ValidationSummary can be used to display errors to the end user. They can specific to a field or just be entity specific, etc. In general, field specific validation shows up next to a control that it is validating (assuming you put the validators next to it). But what about validation that happens in a Domain Service Class or your Custom BLL for example? These exceptions will by default be caught by the application and show as a nasty error to the user, or go to the error page. This is hardly the desired behavior for a validation error.

First I like to change the default behavior of bubbling up to the application to be caught to being handled at the button or page level. To do this I put a try-catch in my button action or other applicable event that you can tap into. In the catch, it would be ideal to add a custom error message to the ValidationSummary. How do we do that though?

Thankfully, it is quite easy to add an item to the ValidationSummary. The key is that the Page has a Validators property that all validators are automatically added to when you put them on your .aspx page. The problem is that we don’t have a CustomValidator.

Thus we need to create a CustomValidator, but what a pain really since we only want to use it when we actually have an exception in our BLL. My solution is to create method to encapsulate the logic to create a new CustomValidator and add it to the Page’s Validators collection. So that it can easily be accessed on any page, I have implemented it as an Extension to the Page class. Below is the code to do so.

namespace MyExtensions
{
    public static class PageExtensions
    {
        public static void AddValidationSummaryItem(this Page page, string errorMessage)
        {
            var validator = new CustomValidator();
            validator.IsValid = false;
            validator.ErrorMessage = errorMessage;
            page.Validators.Add(validator);
        }
    }
}

To use this method just put the using MyExtensions; statement at the top of your code-behind of the page that you want to use it on. Then you can do the following:

protected void btnSubmit_Click(object sender, EventArgs e)
{
    try
    {
        // do some stuff like call my BLL that may throw an exception
    }
    catch (Exception ex)
    {
        if (ex.Message == "Some key string I want to handle")
        {
            Page.AddValidationSummaryItem("Password must be at least 6 characters in length.");
        }
        else
        {
            throw ex;
        }
    }
}

WARNING: Be careful with what you display to the end user. You should never catch an exception and display the Message directly to the user. It could have information that a hacker can use to compromise your application.

UPDATE 5/5/2011:

You may notice that there are times the above method does not work as expected. In particular you may notice that the error message does not show in the ValidationSummary control as you expected even though the Page.IsValid is false (as expected). The problem is likely that you have specified the ValidationGroup on the ValidationSummary control. This is a common issue when using validators and ValiationSummary controls. They must have the same value for ValidationGroup in order to tie them together. When using DynamicData templates the ValidationGroup is NOT set so the above method works great. However, in other situations such as a simple form or maybe the FormView the ValidationGroup property may be specified depending on how your code was generated or if you changed the defaults.

To help with that issue, I have created another version (overloaded method) of this method that takes one addition parameter called validationGroup.

public static void AddValidationSummaryItem(this Page page, string errorMessage, string validationGroup)
{
    var validator = new CustomValidator();
    validator.IsValid = false;
    validator.ErrorMessage = errorMessage;
    validator.ValidationGroup = validationGroup;
    page.Validators.Add(validator);
}

WARNING: If you call Page.Validate() or Page.Validate(“your validation group here”) after the above call, the validator will be reset to valid since we hardcoded the IsValid value and the default is valid.