Tuesday, November 20, 2018

Keeping Secrets out of the web.config

See here for Microsofts official recommendations on best practices to keep secrets out of the web config.

I am mostly concerned about appSettings and connectionStrings sections in the web.config

The Microsoft article says everything I am going to say below, but they are some important points to consider.

appSettings

To keep your appSettings secret, put them in another file that is not checked into source control. The contents of this file will be merged with what is in the web.config so this works well to allow developers to override values in appSettings.

The syntax is basically

<appSettings file="..\..\AppSettingsSecrets.config"> <add key="webpages:Version" value="3.0.0.0" /> <add key="webpages:Enabled" value="false" /> <add key="ClientValidationEnabled" value="true" /> <add key="UnobtrusiveJavaScriptEnabled" value="true" /> </appSettings>

The file attribute accepts paths that are relative or absolve and the file does not have to exist. This is useful when deploying to different environments that may not use this file and instead use VSTS / replacing of tokens to manage values per environment.


connectionStrings

The connectionStrings section isn't as nice as the appSettings. The tags between connectionString tags are replaced by the contents of the external file. The file referenced MUST be in the same directory as the web.config that is referencing it. This means the secret file is per project. The other thing that makes it not work as easily is that it MUST exist otherwise you will get a build error because the project file will try to find the file. You can edit the project file and tell it to only include the file in the project for particular environments, but that is tedious and must be done on each project file.

Thursday, November 8, 2018

Save objects in Visual Studio for reuse later

One easy way to save an object while debugging in Visual Studio so that you can use it later for troubleshooting, or maybe use in LINQPad is to serialize the object to disk.

All the libraries you need are built into .NET and can be done in the Immediate Prompt in Visual Studio.

Save the Object to disk

string json = new System.Web.Script.Serialization.JavaScriptSerializer().Serialize(myObject);
System.IO.File.WriteAllText($@"c:\dev\{nameof(myObject)}.json", json);

Read the Object from disk

string json = System.IO.File.ReadAllText(@"c:\dev\myObject.json");
           
var company = new System.Web.Script.Serialization.JavaScriptSerializer().Deserialize<MyClass>(json);

The caveat to this is that you will need the MyClass available when you bring it back to life.You can also pass Object instead of MyClass if you don't have it.

Wednesday, August 22, 2018

Running IISExpress from the command line or Powershell

You don't need to open up Visual Studio just to run another project. You can run IISExpress via the command line instead.

Here is the same example, once for the command prompt and again for Powershell. The name of the site can be found in the applicationhost.config file. You'll see a <site> tag and the name attribute is the siteName. This is also the name that shows up in the system tray when you launch the site in Visual Studio itself.

You can use the system tray IIS Express icon to quit instances started using Powershell or command prompt. You can also type a the letter Q at the command prompt that gets spawned.

Command Prompt

"C:\Program Files (x86)\IIS Express\iisexpress.exe" /config:"C:\dev\MyMvcApp\.vs\config\applicationhost.config" /site:"MyMvcApp"

You'll need to tweak this to match your paths, etc.

Powershell


$scriptDir = Split-Path $script:MyInvocation.MyCommand.Path

function Start-IisExpress($config, $siteName) {
    Start-Process -FilePath 'C:\Program Files (x86)\IIS Express\iisexpress.exe' -ArgumentList "/config:$config /site:$siteName"
}


Start-IisExpress -config "$scriptDir\.vs\config\applicationhost.config" -siteName: "MyMvcApp"

NOTE: This assumes that you have put this in a Powershell (.ps1) file and placed it next to your solution and more importantly that the .vs directory is in the same directory as the .ps1 file. If not, you'll need to adjust the path or hard code the full path.

Tuesday, June 19, 2018

Fixing build issues


It can be hard to work out exactly where the problem is via visual studio directly. You can use the following to leverage msbuild and get more accurate information.

From a  cmd prompt run:

msbuild /verbosity:d > build.txt

Thursday, June 14, 2018

Testing XPath

If you write XPath it is helpful to have a quick way to test what you are doing. You can give it a try using an online tool XPathTestBed. This is pretty easy to use.

If you are doing XPath on page source you can use the Console built into Chrome or Firefox and get immediate results. Just F12 to get into the developer tools. Go to the Console, and enter the following to get all div tags for example.

$x('//div')

Very useful and easy to use.

Monday, June 11, 2018

How to use Google to find unsecured web.configs

I can't believe how easy it is to find web.config that are not secured. Put this into Google and you will be amazed at what you will get back.

inurl:ftp inurl:web.config filetype:config

or

inurl:http inurl:web.config filetype:config

Imagine if any of them have passwords in them.

inurl:ftp inurl:web.config password

or

inurl:http inurl:web.config password


Wednesday, May 23, 2018

Angular - Creating a Component using Angular CLI

Install Angular CLI

If you don't have Angular CLI you will need to install it using npm

npm install -g @angular/cli


Usage


ng g c products/product-detail.component --flat

ng = Angular CLI
g = generate
c = component
--flat = no folder will be created

This will create 4 files:

  src\app\products\product-detail\product-detail.component.css
  src\app\products\product-detail\product-detail.component.html
  src\app\products\product-detail\product-detail.component.spec.ts
  src\app\products\product-detail\product-detail.component.ts

It will update the file which will register the component in the app.module.ts:
  src\app\app.module.ts

It will also wire the components together putting some useful code in
src\app\products\product-detail\product-detail.component.ts


Wednesday, May 9, 2018

Angular - Retrieving data using http and observables

Import HttpClientModule

Add HttpClientModule to the imports array of one of the application's Angular Modules

The items in bold are the ones that are specific to adding http.

app.module.ts

import { BrowserModule } from '@angular/platform-browser';
import { NgModule } from '@angular/core';
import { FormsModule } from '@angular/forms';
import { AppComponent } from './app.component';
import { HttpClientModule } from '@angular/common/http';


@NgModule({
  declarations: [ AppComponent, ],
  imports: [ HttpClientModule, BrowserModule, FormsModule ],
  providers: [],
  bootstrap: [AppComponent]
})
export class AppModule { }

Adding Http to Service

my.service.ts


import { Injectable } from "@angular/core";
import { IProduct } from "./product";
import { HttpClient } from "@angular/common/http";
import { Observable } from 'rxjs/Observable';
import 'rxjs/add/Observable/throw'
import 'rxjs/add/operator/catch'
import 'rxjs/add/operator/do'
import { HttpErrorResponse } from "@angular/common/http";

@Injectable()
export class ThingService {
    
    private _thingUrl = 'www.myWebApi.com/api/myThings';

    constructor (private _http: HttpClient){ }

    getMyThings(): Observable<IThing[]> {
        return this._http.get<IThing[]>(this._thingUrl)
        .do(data => console.log('data: ' + JSON.stringify(data)))
        .catch(this.handleError);
    }

    private handleError(err: HttpErrorResponse) {
            return Observable.throw(err.message);
    }
}

TIP: The url can be to a local JSON file that has the desired response. This can be useful for mocking out the web service you are calling when testing or rapidly developing.

Using Service / Subscribing

Call the subscribe method of the returned observable

In your component you could have something like this.

ngOnInit(): void {
this._productService.myThings()
.subscribe(things => {
this.things = things;
}, 
error => {
                      /// handle error here...
});
}

Wednesday, May 2, 2018

Kill all instances of a process using Powershell

Sometimes it is just too tedious to click on and kill all the processes in Task Manager in Windows.

If you have a PowerShell prompt open and several instances to kill the following command will do the trick.

Kill the processes

One of my favorite examples:

stop-process -name phantomjs

Get List of Processes

If you don't know the name, use the following command to get a list of all processes running

Get-Process


Tuesday, May 1, 2018

Angular - Services

What is a service

Simply put it is a class with a focused purpose. Generally it is not specific to any component, and thus provides logic that can be used for different components. Useful for encapsulating external interactions such as web api calls, etc.

Dependency Injection

We can use Angular and Dependency Injection to inject the service into the component. This makes testing much easier by allowing for Mocks. Luckily, Angular has a built in injector.

In order for a component to use the service it just needs to add a parameter to the constructor of the component.

Example:

my.service.ts

import { Injectable } from '@angular/core'

@Injectable()
export class MyService {
   getMyThings() : IThing[] { ... }
}

export class MyComponent {
    private _myService;
    constructor(myService: MyService) {
        _myService = myService
    }
}

Tip: Here is the same MyComponent class, but in shorter syntax

export class MyComponent {

    constructor(private _myService: MyService) {
    }
}

Registering the Service


A service can be registered at with different scope. Choose the right method to get the right scope.

Method 1: Registering a Provider

To make the service available to a component and its children add it to the array of providers where the component is defined.

import { MyService } from './my.service';

@Component({
    selector: ...,
    template: ..., 
    providers: [MyService]
})
export class MyComponent {
    constructor(private _myService) {}
}


Wednesday, April 25, 2018

Angular - TypeScript Basic Syntax

Common Data Types

string
number
boolean
any - when we don't care what the type is

Using Data Types

export class MyClass {
      name: string = "Test";
}

Functions

export class MyClass {
      doSomething(name: string) : void {
      }
}

Interface

export interface IMyClass {
    name: string;
    code: string;
    doSomething(name: string) : void
}

Class Inheriting from Interface

import { IMyClass } from './myClass';
export class MyClass implements IMyClass {
    constructor(name: string, code: string) {
    }

    doSomething(name: string) : void { ... }
}

Angular - Interactive Nested Components

Now we want to extend our Display-Only nested component to take input from the user. If the user clicks the stars then notify the parent component.

In the Parent component

Using the nested component

We use it just as you would any component. To get data from the nested component we use the banana in the box [()] syntax.

<myApp-star [rating]='product.starRating' 
      [(notify)]='onRatingClicked($event)'></myApp-star>

$event passes along the appropriate information associated with the event.

Handle the event in the parent component

Add this to the parent component class (.ts file).

  onRatingClicked(message: string) : void {
        // do something with the data sent to us via the message parameter
    }

Implementing the Nested Component

star.component.ts

import { Component, OnChanges, Input } from "@angular/core";
import { Component, OnChanges, Input, Output, EventEmitter } from "@angular/core";

@Component({
    selector: 'pm-star',
    templateUrl: './star.component.html',
    styleUrls: ['./star.component.css']
})
export class StarComponent implements OnChanges {
    @Input() rating: number;

    starWidth: number;

    @Output() ratingClicked: EventEmitter<string> = new EventEmitter<string>();

    ngOnChanges(): void {
        this.starWidth = this.rating * 86/5;
    }

    onClick() : void {
        this.ratingClicked.emit('The rating ' + this.rating + ' was clicked');
    }    

}

Passing data from the nested container to the parent component

The only way to pass data to the parent component is using an event. It needs to be decorated with the @Output for this to work. In this example we are passing a type string, but it could be any object for more complex data. 

star.component.html

<div class="crop" 
    [style.width.px]="starWidth"
    [title]="rating"
    (click)='onClick()'>
    <div style="width: 86px">
        <span class="glyphicon glyphicon-star"></span>
        <span class="glyphicon glyphicon-star"></span>
        <span class="glyphicon glyphicon-star"></span>
        <span class="glyphicon glyphicon-star"></span>
        <span class="glyphicon glyphicon-star"></span>
    </div>
</div>

Notice that rating is a property in the star component and so is title


Angular - Display-Only Nested Components


Using the nested component

If we assume the source below is from some parent component html file it might look like this if we are showing a numeric value for the rating of a product.

{{product.startRating}}

If we then want to use a custom component (nested component) to show a nice graphical star rating instead of the numeric value we would use the syntax (property binding syntax) below assuming our component has a selector of myApp-star and has an input property called rating.

<myApp-star [rating]='product.starRating'></myApp-star>

Implementing the Nested Component

Typically nested components are kept in the shared directory of the project.
Use the component by adding it to the module as a declaration.
Input is sent from the parent component to the child (nested) component using a property on the nested component. 

star.component.ts

import { Component, OnChanges, Input } from "@angular/core";

@Component({

    selector: 'myApp-star',
    templateUrl: './star.component.html',
    styleUrls: ['./star.component.css']
})
export class StarComponent implements OnChanges {
    @Input() rating: number;

    starWidth: number;


    ngOnChanges(): void {

        this.starWidth = this.rating * 86/5;
    }
}

Passing data from parent to nested component

Notice the @Input decorator. It is required to expose a property to a parent component in the html file. The starWidth is recalculated whenever the rating property changes.

star.component.html

<div class="crop" 
    [style.width.px]="starWidth"
    [title]="rating">
    <div style="width: 86px">
        <span class="glyphicon glyphicon-star"></span>
        <span class="glyphicon glyphicon-star"></span>
        <span class="glyphicon glyphicon-star"></span>
        <span class="glyphicon glyphicon-star"></span>
        <span class="glyphicon glyphicon-star"></span>
    </div>
</div>

Notice that rating is a property in the star component and so is title

star.component.css

.crop {
    overflow: hidden;
}
div {
    cursor: pointer;
}

app module

Tell the module that contains the parent component where to find our star component be adding it to the declarations in the module. In the most basic of cases this is the app.modules.ts.

app.module.ts

import { BrowserModule } from '@angular/platform-browser';
import { NgModule } from '@angular/core';
import { FormsModule } from '@angular/forms';
import { AppComponent } from './app.component';
import { StarComponent } from './shared/star.component';

@NgModule({
  declarations: [ AppComponent, StarComponent ],
  imports: [ BrowserModule, FormsModule ],
  providers: [],
  bootstrap: [AppComponent]
})
export class AppModule { }

Monday, April 23, 2018

Angular - Component Life Cycle Hooks

Common Lifecycle Hooks

OnInit

Perform component initialization and retrieve data

import { Component, OnInit } from '@angular/core';
export class MyComponent implements OnInit {
    ngOnInit(): void {
        console.log('In OnInit');
    }
}

OnChanges

Perform action after change to input properties

OnDestroy

Perform cleanup for the component


Thursday, April 19, 2018

Angular - Transforming Data with Pipes

Sometimes we need to transform bound properties before it is displayed. Such is the case with formatting dates, currency, decimals, etc. Pipes can be chained.

Built-in Pipes


  • date
  • number, decimal, percent, currency
  • json, slice, etc
The complete list and more information can be found here.

Examples (no parameters):

{{ product.productCode | lowercase }}
<img [src]='product.imageUrl' [title]='product.productName | uppercase'>
{{ product.price | currency | lowercase }}

Examples (with parameters)

NOTE: Parameters are separated by colons

{{ product.price | currency: 'USD' : true : '1.2-2' }}


Custom Pipe

import { Pipe, PipeTransform } from '@angular/core';
@Pipe({name: 'myTransform'})
export class MyTransform implements PipeTransform {
     transform(value: string, customParam1: string): string { ... }
}

Add it to your module (i.e. app.module.ts) as shown here:

@NgModule({
imports: ...
declarations: [ AppComponent, MyTransform ],
bootstrap: ...
})

Use it just like the built in pipes

Angular - Property and Event Bindings

Binding with Interpolation

Use {{expression}} to pull (only one way binding) in content from the component class. The expression can have many forms.

For example:
{{propertyName}}
{{'ABC' + functionName()}}
{{'Answer is ' + 3*2}}
{{showImage ? 'Hide' : 'Show'}} Image

<img src={{product.imageUrl}}>

Notice that it does not use quotes!

Property Binding

Property Binding is one way just like interpolation.

We could use interpolation to set the src url for an image using:

<img src={{product.imageUrl}}>

or 

<img src='http://someUrl/{{product.imageUrl}}'>

We can use Property binding to do the first case, but not the second case.

<img [src]='product.imageUrl'>

The syntax for Property Binding has a two parts:
  • Binding Target - Is always in surrounded by []
  • Binding Source - Is Surrounded by '' (two single quotes).
Generally, Property Binding is preferred instead of interpolation.

Event Binding

When the user clicks something an event is generated. We can listen for these events using Event Binding. Here is the syntax.

<button (click)='doSomething()'>

The syntax for Property Binding has a two parts:
  • Target Event - Is always in surrounded by ()
  • Template Statement - Is Surrounded by '' (two single quotes).
In this example, when the button is clicked the doSomething() method in our component class is executed.


Two-way Binding

This is useful for having the component and dom in sync such as in the case of an input field on a form.

<input [(ngModel)]='someProperty'>

The Banana in a Box metaphor can be used to remember the order of the parenthesis. Imagine the [()] to have a banana as () in a box as [].

The class for the component would be something like this.
export class MyComponent {
    someProperty: string = 'abc';
}

ngModel is a keyword defined in the FormsModule. The FormsModule will need to be added to the AppModule. To do this open your app.module.ts and add to the top of the file the following:

import { FormsModule } from '@angular/forms';

Next, in the same app.module.ts file add FormsModule to the array of imports in the @NgModule().


Wednesday, April 18, 2018

Angular - Page Layout syntax

Built-in Structural Directives

*ngIf

This adds control flow to the page for hiding and showing content based on conditional logic.

<div *ngIf='someLogic()'>
      Some content to show
</div>

*ngFor

This adds control flow to the page for looping over content like a for loop.

<div *ngFor='let obj of objects'>
      <div>{{obj.PropertyHere}}</div>
</div>

Tuesday, April 17, 2018

Angular - Creating a Component in Angular

Component

A Component has 3 parts

  • Template
    • View layout
    • Created with HTML
    • Includes binding and directives
  • Class
    • Code supporting the view
    • Created with TypeScript (.ts file)
    • Properties for data
    • Methods for logic
  • CSS
    • A CSS file for the styling needed for the component
  • Metadata
    • Extra data for Angular
    • Defined with a decorator

Example

app.component.ts file


import { Component } from '@angular/core';

@Component({
  selector: 'myApp-root',
  templateUrl: './app.component.html',
  styleUrls: ['./app.component.css']
})
export class AppComponent {
  title = 'Hello World';
}

  • The import pulls in dependency references
  • @Component is the metadata / decorator that says the class is a component. This is similar to an [Attribute] in C#
  • export makes the class definition available for user elsewhere.
  • The selector is a unique value for this component in the application. It is suggested you prefix selectors with something that identifies it as part of your app. This is also what is used as a tag to use this component in another component. In this case it is <myApp-root><myApp-root>
  • It is common to append "Component" to the name name of the class so that it is clear that it is a component.

app.component.html

<div>
  <h1>
    Hello{{title}}!!
  </h1>
</div>

This is the HTML that defines the layout. Anything in {{...}} tags are binds to properties in the class associated with this component.

app.component.css

h1 { text-align:center }

This is a standard CSS file, except these styles will be unique to this component automatically. They will not affect other styles in the project.

Imports

Some common Angular Modules you may need to import are:
  • @angular/core (as we have done above)
  • @angular/animate
  • @angular/http
  • @angular/router

Using the Component

This is how you would use it in index.html for example:

<body>
<myApp-root></myApp-root>
</body>

Telling index.html about our Component

In app.module.ts you list what angular modules should be included in our application#

import { BrowserModule } from '@angular/platform-browser';
import { NgModule } from '@angular/core';
import { AppComponent } from './app.component';

@NgModule({
  declarations: [ AppComponent ],
  imports: [ BrowserModule ],
  providers: [],
  bootstrap: [AppComponent]
})
export class AppModule { }

Angular - Running Angular application using npm / Visual Studio Code

Assumptions

Using Visual Studio Code (on Windows)

Opening Integrated Terminal

View menu -> Integrated Terminal

Install packages

Open Integrated Terminal and type:
npm install

Launching Angular Application

Open Integrated Terminal and type:
npm start
This will build app and launch in the browser.

This also launches the web server. To stop the web server type control-c at the command prompt.

Tuesday, March 27, 2018

Setting the Timeout for the WinRM - SQL Server DB Deploy

The parameters to the WinRM –SQL Sever DB Deploy task in VSTS can be used do a backup using the inline sql script.It is a good idea to set the additional arguments  to be -ConnectionTimeout 120 -QueryTimeout 120 (for two minutes of timeout). Set the number of seconds to a reasonable value for your system.

If you don't and your backup exceeds the default timeout (90 seconds I believe), then you will get an error like this:

##[error]Microsoft.PowerShell.Commands.WriteErrorException: Deployment on one or more machines failed.
System.Exception: The running command stopped because the preference variable "ErrorActionPreference"
or common parameter is set to Stop: Timeout expired. The timeout period elapsed prior to completion
of the operation or the server is not responding.

It is actually SQL Server complaining that the time has elapsed, but it is doing so based on wht the WinRM says is the timeout.

To set the timeout open your WinRM - SQL Sever DB Deploy task in VSTS and set the Additional Arguments to  -ConnectionTimeout 120 -QueryTimeout 120.

Friday, March 16, 2018

Change Windows credentials when connecting to a database using Windows Authentication

Image you have a two accounts in Active Directory. You have one that you log into Windows (call it BasicUser1 for example). The other is one that you use for development and is the account (call it DevUser1 for example) that you need to use to access a MS SQL Server database using Windows Authentication.

Now when running SSMS (SQL Server Management Studio), LINQPad, Visual Studio, etc and trying to connect to a database that requires Windows Authentication (using DevUser1), but you are logged into Windows as BasicUser1 which doesn't have permissions to the database.

The problem is how do we impersonate DevUser1 when connecting to the database using Windows Authentication. The answer is actually pretty simple and seamless once configured.

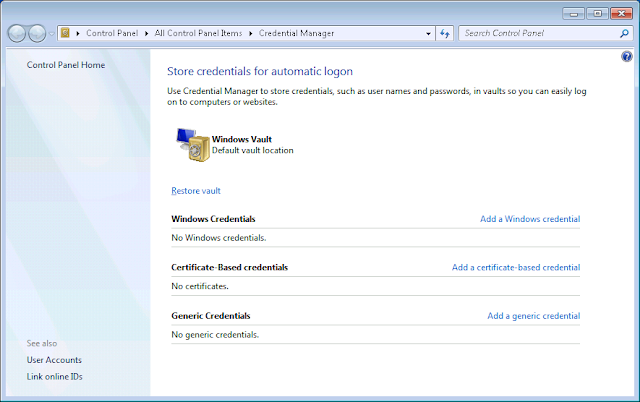
The answer is the Credential Manager built into Windows. You can find it in the start menu, but you can also run it directly using:

control /name Microsoft.CredentialManager

It looks something like this:


Click the Add a Windows credential link.

Enter the fully qualified server name, etc AND the port for the SQL Server database (the default is 1433). The username should be in the format domain\username. The password is the password for the specified user.

Now when you connect to the database with Windows Authentication Windows will automatically pass the credentials specified in the Credential Manager, not the ones you are currently logged into Windows as.

Friday, February 23, 2018

Good command line or programmatic image manipulation app

Check out ImageMagick to programmatically or from the command prompt manipulate images. It supports a ton of formats. It has support from .NET and Java, etc.

A very good tool to have in your toolbox.

Get Proxy settings when you don't have access to see them

Open a command prompt and enter the following command


Command Line

netsh winhttp import proxy source = ie


You should get output like:

Current WinHTTP proxy settings:

    Proxy Server(s) :  some.corp-proxy:8080
    Bypass List     :  some.corp-servers...

Chrome

If you have Chrome it has an interesting feature for doing so as well.


chrome://net-internals/#proxy

This will give some results similar to the following

Proxy server: some.corp-proxy:8080
Bypass list: 
  some.corp-server...

Friday, February 2, 2018

nslookup like functionality from Powershell

Below is a Powershell script that takes a list of aliases that you want to lookup. For each item in the list it will output a line. Each line is tab separated and composed of the alias, the host name, and the ip address (first one if there are multiples). The output can be copy and pasted into Excel easily. Any errors will be shown in Red.

$aliases = @(
'www.apple.com',
'www.apple.co.uk'
)

foreach ($alias in $aliases)
{
    try
    {
        $entry = [System.Net.DNS]::GetHostEntry($alias)
        $tab = [char]9
        $hostname = $entry.HostName
        $ipAddress = $entry.AddressList[0].IPAddressToString
        Write-Host "$alias$tab$hostname$tab$ipAddress"
    }
    catch 
    {
        Write-Host "$alias could not be processed" -ForegroundColor Red
    }    
}

There are actually Powershell packages that implement nslookup, but they require something be installed, imports, dependencies, etc. The only dependency to run this is that C# be installed and System.Net.DNS be available.

Example output is:

www.apple.com e6858.dsce9.akamaiedge.net 2.20.214.243
www.apple.co.uk apple.co.uk 17.172.224.108

Tuesday, January 30, 2018

Angular - Getting Started with Angular and Visual Studio Code

Download and Install

Visual Studio Code (could use Visual Studio also or many other editors)
npm
Angular CLI
Angular Quickstart App

Setup

Open the View -> Interactive Terminal and type npm install to install all the packages specified in packages.json. Files will be put in node_modules which can safely be excluded from source control if desired since it can be rather large.


Running your app

Open the View -> Interactive Terminal and type npm start. This will build, start the web server, and open the browser.

Stopping your app

Go back to the Interactive Terminal and type Control-C and then Y to stop the web server.

Making Changes

If you make changes to the .html files the changes are automatically updated in the browser.

Friday, January 26, 2018

Blocking

Task.Delay()

If you are in an async method and you want to have it wait for a period of time before continuing your first thought might be to use Thread.Sleep(), but this would work the way you may think. Task.Delay() is what you want to use. Sleep just sleeps on the current thread which is the same as the thread that is calling the async method. Having an async method does NOT create threads unless the

Task.Run()

Task.Run() method is used to run a non-async method on another thread (from the thread pool by default). This is essentially just a background thread and has nothing to do with async. However since Task.Run() returns a Task you can await the result. This makes tracking the task and getting the result very easy.

Task.Run() is a good way to run a non-async method from an async method. There is overhead of spinning up an additional thread just to run this non-async code and then we would await the completion of the thread. This overhead is sometimes the only option if there is no async method available to call and all you have is a non-async method to call and you don't have access to change it.